Support
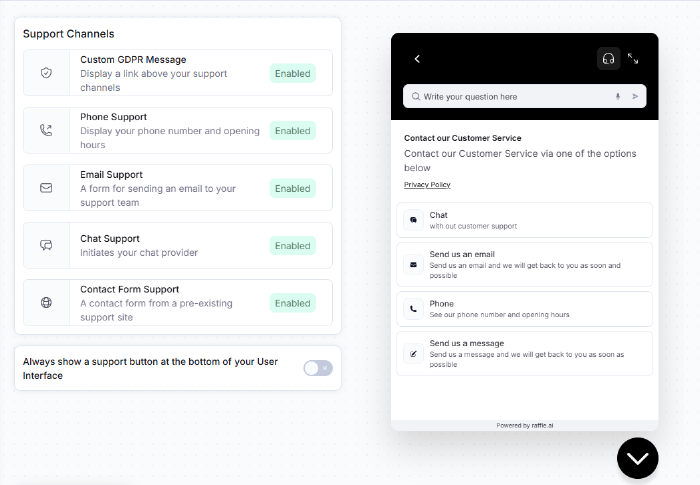
Add, edit, or remove the Customer Support channels available to users. Setting and modifying the field values on the left reflect real-time changes on the Live Widget Preview on the right. Even more settings can be altered via Text Override > Support
You can read more about Support Channels on our website.
Each widget has its configuration, allowing you to customize them individually. To apply the same configuration to multiple widgets, update each widget to ensure synchronized displays and behaviors.
All widgets can be modified from Tools
-
Go to Tools
-
Select the widget to modify
-
Click the Support icon in the bottom-right menu
Support Channels
Multiple Customer Support channels can be added to the Raffle Search or Chat assistant. The sections below describe how to add, edit, or remove the Customer Support channels available to users. Read more about Support Channels on our website.
The titles and descritions of the Support Channels can be changed via Text Overides
Note
If only one channel is enabled, users are immediately redirected to that channel, and displaying the list of contact options will be skipped. For example, if only contact form is enabled, users are redirected to the provided link when the contact button has been clicked.
Available Support Channels
Custom GDPR Message
Set the custom label and link to any page (e.g. GDPR section or booking page). This link appears below the Support Channel description. Note that at least one support channel has to be selected to enable Custom GDPR.
-
Click the Custom GDPR Message bar
-
Toggle Custom GDPR Message to display link above support channels
-
Click the GDPR Description URL and enter the URL for your company’s privacy policy page or other
-
Enter a label for the web page in the Label text field
-
Click Save Changes
Phone Support
Set multiple Customer Service phone number(s).
-
Click the Phone Support bar
-
Toggle Enable Phone Support to enable the phone support option
-
Click Add new contact to add phone contact information
-
In the Phone number title text field, enter a label that differentiates the employee or department contact
-
Enter the Phone number of the employee, company, or department in the corresponding text field
-
Click Add time and set the days and times when the channel is open (use 24-hour format e.g. 08:00 - 17:00)
You can add multiple phone numbers by repeating the steps 6-9
- Click Save Changes
Email Support
Set the Customer Service contact email.
-
Click the Email Support bar
-
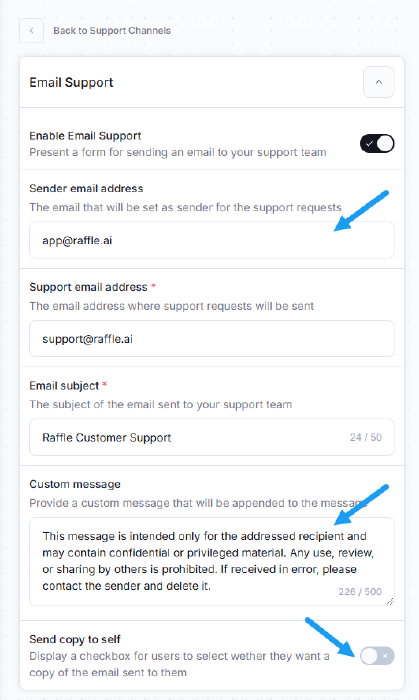
Toggle Enable Email Support to enable the phone support option
-
Click Support e-mail adress to specify the recipient. All messages sent via this support option will be sent to the stated email address
-
Enter the Email subject for the e-mails subject line. The default is
[raffle Search] Email Support -
Click Save Changes
Additional options for E-mail Support:
-
Setting a Sender email address, so you know which channel the e-mail was generated in. Thereby, you can easily set up rules to sort support e-mails. When no e-mail is specified, the e-mails defaulted as from the Raffle
no-replyemail. -
Adding a custom message Custom message that will be appended to messages sent via the support. This could be the domain origin of the e-mail, a confidentiality disclaimer, or other
-
Send a copy of the e-mail to the user. By doing so, they also have the email and can check the information they have sent. Toggle Send copy to self to allow this

Additional settings for E-mail Support
The Availability for Support section shows how you can specify and restrict when this support channel is available
Chat Support
As a Chat Support, you can link to a partner chat vendor. If your vendor is not on the list, please contact Raffle Support.
Note that the chat service must already be implemented on the page.
-
Click the Chat Support bar
-
Toggle Enable Chat Support to activate the chat support option
-
Unfold the Vendor dropdown menu and select the vendor implemented on your chosen platform
-
Click Save Changes
If Zendesk is your vendor, you can toggle Inject first message. This skips any configured pre-chat form and inserts the users’ search entry as the first part of the message
Section Availability for Support shows how you can specify and restrict when this support channel is available
Contact Form Support
Link to an existing Contact Us page or any other relevant page.
-
Click the Contact Form Support bar
-
Toggle Enable Chat Support to enable the link support option
-
Click the Form URL text field and enter the URL link for the target web page the user should be redirected to e.g. contact form, booking page, etc.
-
Click Save Changes
The Availability for Support section, shows how you can specify and restrict when this support channel is available
Availability for Support Channels
The availability of each support channel can be customized to control when it is displayed. This allows you to specify and restrict the periods where the channel is visible to site users. When a user accesses the site outside the specified times then the support button will be hidden.
Start by following the steps, in the section above, for the type of Support Channel you want to restrict the availability of. The guide below uses the Live Chat Support Channel as an example, but the availability management steps are the same for all support channel types except Custom GDPR Message.
-
Toggle Condition availability
-
Click either Add SHOW rule or Add HIDE rule to state when to display or remove the live chat support option from view.
a. Adding a SHOW rule:
Click the From and To dropdowns, in turn, to mark the timeframe in which the chat should be available. Then select the repeating pattern where the channel is available (e.g., all weekdays).
b. Adding a HIDE rule:
Click the calendar icons and select the From and To dates the support channel should be hidden and unavailable.
Multiple show/hide rules can be added, by reclicking either Add SHOW rule or Add HIDE rule
- Click Save Changes
Always show a support button of the bottom of your UI
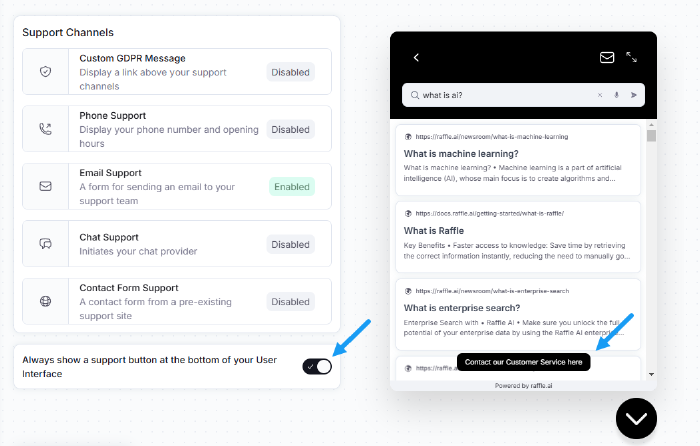
Toggle to always display the Contact Us button when the widget is launched. It ensures that the support option is always displayed to users. The Support button is hidden by default until a question has been asked.
-
Toggle EAlways show a support button at the bottom of your Tool to enable
-
Click Save Changes
Note that this option is only available once a support channel has been enabled

Always Display Support Button at The Bottom of UI